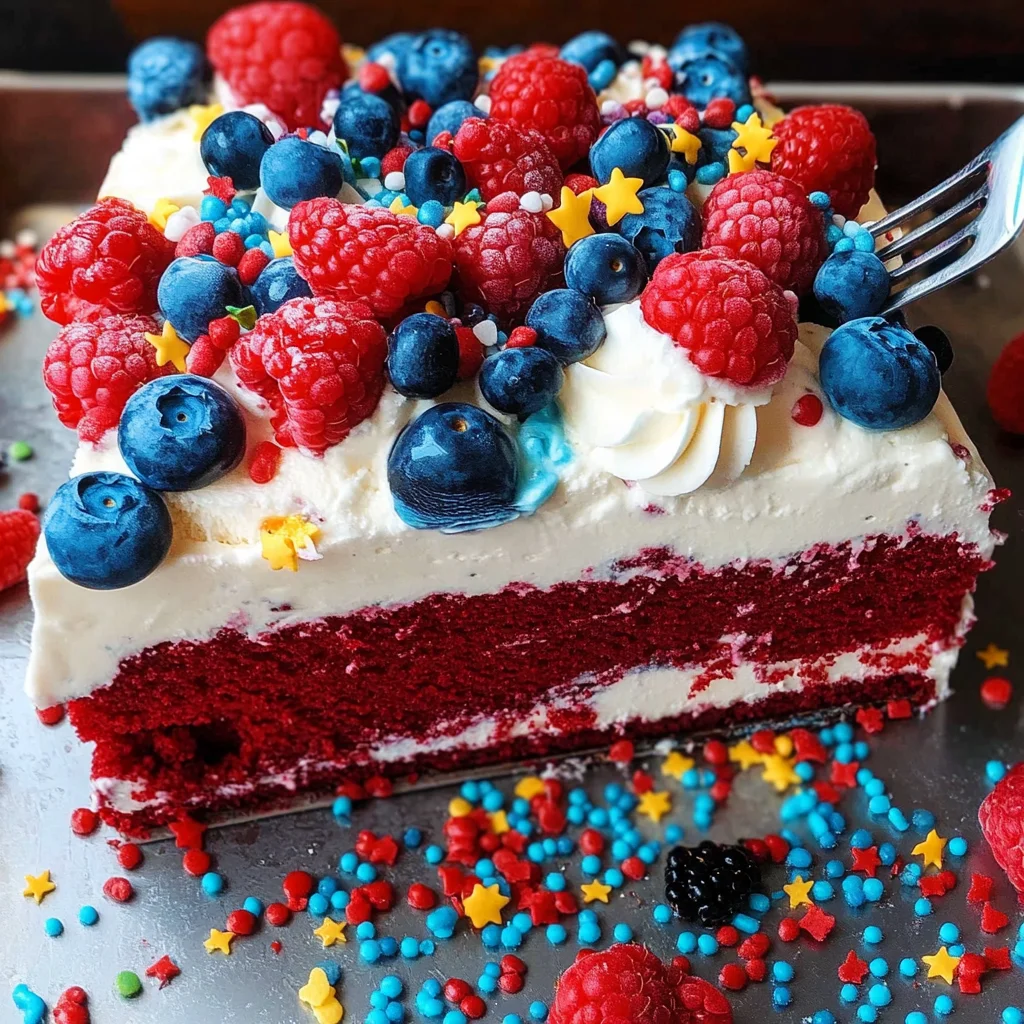
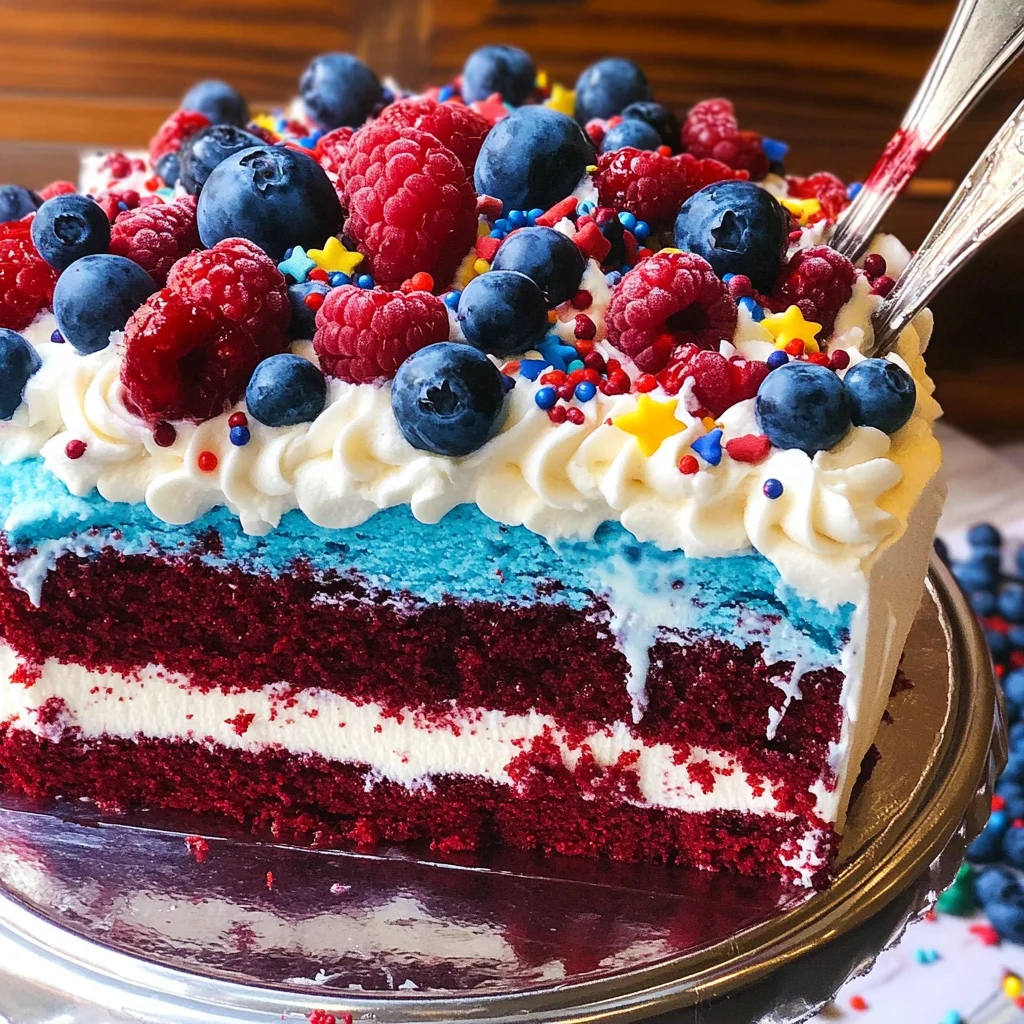
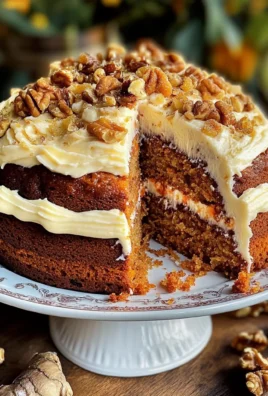
A Red White And Blue Ice Cream Cake is the perfect showstopper for summer celebrations, whether it’s a family gathering, a picnic, or a festive holiday like the Fourth of July. This delightful dessert not only looks stunning with its vibrant layers but also offers a delicious combination of flavors that everyone will love. With smart layering techniques and make-ahead options, this cake holds its shape beautifully, ensuring you can slice it without any mess.
Why You’ll Love This Recipe
- Beautiful Presentation: The striking red, white, and blue layers create an eye-catching centerpiece for any occasion.
- Make-Ahead Convenience: Prepare in advance to save time on busy days while still impressing your guests.
- Easy to Assemble: Simple steps make this dessert accessible even for beginner bakers.
- Customizable Toppings: Add fresh berries or fun sprinkles to elevate your cake’s look and taste.
- Perfect for Any Occasion: Ideal for holidays, birthdays, or any summer celebration.
Tools and Preparation
Having the right tools makes creating your Red White And Blue Ice Cream Cake much easier. Here are the essentials you’ll need:
Essential Tools and Equipment
- Stand Mixer
- 13 x 9-inch Pan
- Mixing Bowls
- Spatula
Importance of Each Tool
- Stand Mixer: Ensures perfectly whipped cream with minimal effort, saving you time and energy.
- 13 x 9-inch Pan: Provides ample space for baking the cake evenly and is easy to store in the freezer.
- Mixing Bowls: Handy for preparing each layer separately without confusion.
- Spatula: Essential for spreading layers smoothly and evenly.
Ingredients
A Red White And Blue Ice Cream Cake that actually holds its shape. Built with smart layering, make-ahead timing, and tested shortcuts so you avoid melting, uneven layers, and messy slices.
For the Cake
- 1 box red velvet cake mix (13 to 15 ounces)
For the Ice Cream Layer
- 1 carton blue ice cream (48 ounces)
For the Whipped Cream Topping
- 2 cups heavy whipping cream
- 1 cup powdered sugar
- 1 teaspoon blue gel food coloring
- 1/2 teaspoon vanilla extract
For Decoration (Optional)
- Blueberries
- Raspberries
- Sprinkles
How to Make Red White And Blue Ice Cream Cake
Step 1: Prepare the Cake Base
- Prepare the red velvet cake mix in a 13 x 9-inch pan according to package instructions.
- Allow it to cool completely at room temperature before covering it and placing it in the freezer for at least one hour.
Step 2: Add the Ice Cream Layer
- Allow the blue ice cream to sit at room temperature for about 20 to 25 minutes until it’s soft enough to spread.
- Spread an even layer of blue ice cream over the frozen red velvet cake.
- Cover and return it to the freezer for at least one hour.
Step 3: Whip the Cream
- In a stand mixer fitted with a whisk attachment, place heavy whipping cream.
- Whip at medium-high speed until soft peaks form.
- Gradually add powdered sugar while mixing on low speed until fully incorporated.
- Increase speed back to medium-high and whip until medium peaks form.
- Add blue gel food coloring and vanilla extract; mix until combined.
Step 4: Finish with Whipped Cream
- Spread an even layer of whipped cream over the ice cream layer.
- Cover again and freeze for at least one hour.
Step 5: Serve Your Cake
- Once fully frozen, let the cake sit at room temperature for about five minutes before slicing.
- Decorate with blueberries, raspberries, or sprinkles as desired before slicing and serving.
Enjoy this deliciously festive treat that embodies summer spirit!
How to Serve Red White And Blue Ice Cream Cake
This delightful Red White And Blue Ice Cream Cake is perfect for summer celebrations, especially around patriotic holidays. Here are some fun serving suggestions to enhance your dessert experience.
Family Style
- Slice and Share: Cut the cake into generous slices and serve on a large platter for a family-style dessert that everyone can enjoy.
- Ice Cream Scoops: Offer extra scoops of blue ice cream on the side for those who want an extra creamy treat.
Individual Portions
- Cupcake Style: Serve individual slices in cupcake liners for easy handling at parties or barbecues.
- Dessert Cups: Layer small cups with crumbled cake and whipped cream for a fun take on this classic dessert.
Garnishes
- Fresh Berries: Top each slice with blueberries and raspberries for an added burst of flavor and color.
- Sprinkles: A sprinkle of festive colored sprinkles can brighten up each serving, making it more appealing to kids and adults alike.
How to Perfect Red White And Blue Ice Cream Cake
Creating the ideal Red White And Blue Ice Cream Cake requires attention to detail. Here are some tips to ensure it turns out perfectly every time.
- Chill Your Tools: For better whipping results, chill your mixing bowl and beaters before whipping the cream.
- Layer Wisely: Ensure each layer is even to maintain the visual appeal when slicing.
- Freeze Between Layers: Allow sufficient freezing time between layers to prevent melting and mixing of colors.
- Use Quality Ingredients: High-quality ice cream and fresh berries will elevate the taste of your cake significantly.
- Decorate Just Before Serving: Add any toppings or decorations right before serving to keep them fresh and vibrant.
Best Side Dishes for Red White And Blue Ice Cream Cake
Pairing side dishes with your Red White And Blue Ice Cream Cake can complement its flavors while creating a well-rounded dessert table. Here are some tasty options to consider.
- Fruit Salad: A refreshing mix of seasonal fruits can balance the richness of the cake.
- Grilled Peaches: Lightly grilled peaches add a warm, sweet contrast that pairs beautifully with ice cream.
- Lemonade Slushies: A frosty lemonade slushie offers a zesty refreshment alongside this indulgent treat.
- Chocolate-Covered Strawberries: These sweet bites add an elegant touch and a hint of decadence.
- Mini Pavlovas: Light meringue nests filled with whipped cream and berries provide a delightful crunch.
- Nutty Granola Parfaits: Layer granola with yogurt and fruit for a crunchy, creamy option that complements the cake’s texture.
Common Mistakes to Avoid
When making a Red White And Blue Ice Cream Cake, it’s easy to overlook a few key steps. Here are some common mistakes and how to avoid them.
- Skipping the Freezing Step: Not allowing each layer to freeze properly can lead to a mushy cake. Make sure each layer is frozen for at least an hour before adding the next.
- Not Using Softened Ice Cream: If ice cream is too hard, it will be difficult to spread evenly. Let it sit at room temperature for 20-25 minutes before spreading.
- Overwhipping Cream: Whipping the cream too much can turn it into butter instead of creating fluffy peaks. Stop when medium peaks form for the best texture.
- Ignoring Layering Techniques: Uneven layers can affect the appearance and stability of your cake. Use a spatula to smooth out layers for a neat finish.
- Cutting Too Soon: Slicing the cake immediately after removing it from the freezer can result in messy pieces. Allow it to sit at room temperature for 5 minutes before cutting.
Storage & Reheating Instructions
Refrigerator Storage
- Store leftover cake in an airtight container.
- It will last up to 3 days in the refrigerator.
Freezing Red White And Blue Ice Cream Cake
- Wrap individual slices in plastic wrap and place them in a freezer-safe container.
- The cake can be frozen for up to 2 months without losing quality.
Reheating Red White And Blue Ice Cream Cake
- Oven: Preheat to 350°F (175°C) and warm slices for about 10 minutes.
- Microwave: Heat on low power for about 30 seconds or until slightly softened.
- Stovetop: Place slices in a pan over low heat until warmed through.
Frequently Asked Questions
Here are some common questions about making a Red White And Blue Ice Cream Cake.
Can I use other flavors of ice cream?
Yes! Feel free to experiment with different flavors such as strawberry or vanilla while maintaining the red, white, and blue theme.
How long does it take to make this cake?
The total time is about 250 minutes, including preparation, cooking, and freezing time.
What can I use instead of heavy whipping cream?
You can use coconut cream or any plant-based whipping cream as an alternative.
Is this cake suitable for outdoor events?
Absolutely! Just keep it chilled until serving, especially on warm days.
Final Thoughts
The Red White And Blue Ice Cream Cake is not only visually stunning but also deliciously creamy and fun to customize. You can change up flavors or decorations based on your preferences or seasonal ingredients. Try making this delightful dessert for your next gathering!
Red White And Blue Ice Cream Cake

Indulge in the ultimate summer treat with this vibrant Red White And Blue Ice Cream Cake, perfect for gatherings and celebrations. Layers of rich red velvet cake and creamy blue ice cream create a stunning visual that will impress everyone at your next event. This no-bake dessert is not only beautiful but also easy to prepare ahead of time, ensuring you have more moments to enjoy with your friends and family. Top it off with fluffy whipped cream and fresh berries for a delightful finish that embodies the spirit of summer fun.
- Prep Time: 45 minutes
- Cook Time: 25 minutes
- Total Time: 1 hour 10 minutes
- Yield: Approximately 12 servings 1x
- Category: Dessert
- Method: Baking
- Cuisine: American
Ingredients
- 1 box red velvet cake mix (13 to 15 ounces)
- 1 carton blue ice cream (48 ounces)
- 2 cups heavy whipping cream
- 1 cup powdered sugar
- 1 teaspoon blue gel food coloring
- Fresh blueberries (for decoration)
- Fresh raspberries (for decoration)
Instructions
- Prepare the red velvet cake mix according to package instructions in a 13 x 9-inch pan. Cool completely and freeze for at least one hour.
- Soften blue ice cream at room temperature for about 20 minutes, then spread over the frozen cake layer. Freeze again for at least one hour.
- In a stand mixer, whip heavy cream until soft peaks form. Gradually add powdered sugar, then increase speed until medium peaks form. Mix in blue gel food coloring.
- Spread whipped cream over the ice cream layer, cover, and freeze for an additional hour.
- Let sit at room temperature for five minutes before slicing. Decorate with fresh berries and serve.
Nutrition
- Serving Size: 1 serving
- Calories: 310
- Sugar: 29g
- Sodium: 150mg
- Fat: 18g
- Saturated Fat: 11g
- Unsaturated Fat: 6g
- Trans Fat: 0g
- Carbohydrates: 32g
- Fiber: 1g
- Protein: 3g
- Cholesterol: 60mg
Leave a Comment